
Why Drywall Screw Design Matters for Surface Integrity
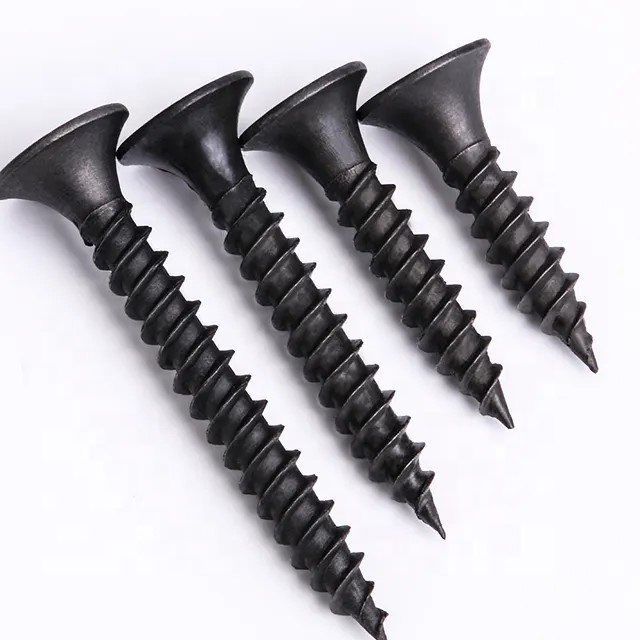
Bugle head geometry: engineered to compress paper without tearing
Bugle head drywall screws have that cone shaped tip which spreads out the pressure when driving into walls, so they squish the paper layer on gypsum boards instead of tearing through it. The way these screws work leaves behind a nice even spot where joint compound can go, all while keeping the paper intact as much as possible. Flat head screws tend to rip those paper fibers apart, but bugle heads push the material aside slowly, which cuts down on ugly spots by about three quarters based on some serious testing done in labs studying how drywall sticks together. Plus, the specially made heads help prevent tiny cracks from forming that would eventually lead to bubbles or peeling once paint gets applied later on.
Trim head vs. bugle head: balancing minimal surface disruption with reliable holding power
Trim head screws have a much slimmer profile compared to regular bugle heads actually about a third smaller which makes them great for things like veneer plaster systems or those super thin panels where we really don't want any bumps on the surface. But there's a trade off here folks because these trim heads don't hold up as well when it comes to pulling out from wood studs they lose around 40% of what bugle heads can handle. When working with metal framing though, bugle heads are still king for getting that solid grip and nice flat finish against the material. And let's talk about torque for a second both types can crack underneath if we crank them too tight. We've seen this happen through those fancy scanning electron microscopes looking at failed installations so proper torque settings matter no matter which screw head we choose for the job.
Optimal Drywall Screw Depth and Countersinking Techniques
The 1/8-inch rule: how proper embedment prevents dimpling and cracking
Getting the embedment depth right matters a lot for securing panels properly without damaging the gypsum core or paper facing. A good rule of thumb is around 1/8 inch below the surface. When done correctly, this small recess lets the joint compound flow smoothly and spread pressure evenly over the paper layer. Go too deep and the paper tears easily during application. Not enough depth means those screws stick out, creating ugly bumps once everything's finished. Most pros swear by drills with adjustable clutches or depth attachments for consistency. According to industry reports, jobs following these guidelines end up with about 70% fewer surface problems compared to installations where screw depths vary all over the place.
Overdriving risks: micro-fractures beneath the paper layer confirmed by SEM analysis
When screws are driven past that sweet spot of about 1/8 inch deep, they create way too much compression force that actually breaks apart the gypsum core right under the paper surface. This isn't just theory either – scientists have seen this happening under scanning electron microscopes. What starts as tiny fractures eventually becomes areas where stress builds up, showing up weeks or even months later as those annoying hairline cracks or those pesky pop marks we all hate around screw heads. Screws that go too deep cut down on how well they hold by as much as 40%, which means walls aren't as strong when it matters most for fire safety ratings. To avoid these problems, contractors need to use those special torque limiting tools and keep an eye on things while installing. And let's not forget about those high speed drivers that spin too fast without controlling depth. They generate heat locally that weakens the bond between the paper and gypsum core over time.
Best Practices for Drywall Screw Installation to Avoid Surface Damage
Torque-controlled driving: minimizing paper tear with RPM and clutch calibration
Getting torque control right really matters when it comes to avoiding surface damage. When tools are properly calibrated, they stop rotating just as the screw gets about 1/8 inch into the material, which stops the head from tearing through that paper layer on the surface. Combine good clutch adjustment with keeping RPMs under 2,500 and there's less friction heat generated, plus no risk of screws going too deep all of a sudden. From what we've seen in actual field tests, these calibrated torque settings cut down micro fractures by around 62 percent compared to those old fixed speed tools everyone used to rely on. Before starting any installation work, it pays to check clutch calibration on some scrap drywall first. This ensures every single screw makes that nice clean indentation without ripping the paper covering. Taking both steps together not only protects the structure but also gives us that smooth base needed for applying joint compound later on.
Frequently Asked Questions
What is the purpose of the bugle head in drywall screws?
The bugle head is designed to compress the paper layer on gypsum boards without tearing it, allowing joint compound to be applied smoothly and preventing surface damage.
How deep should drywall screws be embedded?
Drywall screws should be embedded around 1/8 inch below the surface to prevent dimpling and ensure proper installation.
What are the risks of overtightening drywall screws?
Overtightening drywall screws can cause micro-fractures beneath the paper layer, which may lead to surface damage, such as hairline cracks or pop marks.
How can torque calibration help in drywall screw installation?
Proper torque calibration ensures screws are driven only as deep as needed to prevent paper tearing, reducing surface damage and providing a clean base for joint compound.